Monday, 28 November 2011

(SOMEWHERE) You really shouldn't go

I have chosen to take a photograph for "somewhere you really shouldn't go" because i have a great place in mind already of where to take the pictures. In lancaster there is an arch way with a door that is meant to be blocked off ....but dun dun duuuun! Its OPEN! 
Behind this door there is a small area of shrubs and weeds but there is a circle where the shrubs and weeds have just stopped growing and in the center of this circle there is a stone/shrine where people actually come from all across england to worship the witches that were hung and buried there!
I want to take a photograph of this place and try to make it look spooky! I will then edit it also to give it some more effects.

Photoshop - Filter liquify

We were using photoshop and practicing with the tools on Filter/liquify. This is a picture that i edited of myself using photoshop.

Sunday, 27 November 2011

(SOMEWHERE) If i had to leave my heart somewhere where would it be?

I have chosen to work towards taking a photo for "if i you had to leave your heart somewhere where would it be?". My first thought for this was to take a photograph of Laura's hands out in front of her with her hands together as if she was holding a heart, this is because i know that if there was one place or one person i can trust to look after it, it would be Laura. Then i got the idea to make it look like blood was in her hands and on her arms from one of my CD album covers, the pictures below are of the CD to show what how i want it to look.

To do this i am going to use red food coloring and lube/jelly because apparently that works well for looking like blood! Also i have decided that if i can i will buy a pig/sheep or somethings heart and then she can hold that for the photograph.
The only thing that i'm still thinking about is where to take the photo's and what she should be wearing because there needs to be a suitable background for the theme and i don't want her to be wearing home/normal clothes i want it to be something to go with the theme or a dark gothic dress.

Wednesday, 23 November 2011

SOMEWHERE colour ideas

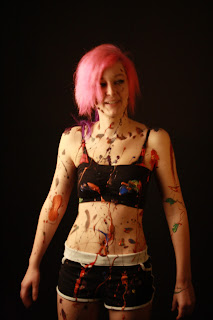
This was Jasmine's idea to use for the "somewhere/something colorful". Basically we took lewis and jasmine's friend outside, got them to take of most of their clothes and then we threw paint at them! So a normal day really....
I thought i would just include this as it is to do with the brief although i am not going to use this idea or any of the photos for my final 6 photographs as this was jasmine's idea and not my own so i would kind of be stealing her work.


SOMEWHERE dark

I went out to try and get some "somewhere dark" photographs. These photos are a mixture of experiments and practicing but there are also some that i quite like and think that with a bit of editing i will use as my final image.
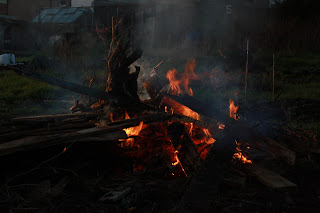
 This photo of the fire was basically just a quick snap as i was walking past because i thought maybe it could be used towards my "something dark" so i took my camera out quickly and this was the best picture that i took.

In this photograph i was trying to capture the fog/mist over the top of the stream but i couldn't get a picture with the fog/mist closer to the camera, it only showed up further down the stream. While i was taking this photograph quite a lot of cars drove past on the road and their head lights have been caught in the photo and i do not like it because it takes the attention away from the stream and the fog and its also too bright.
This was my second attempt at capturing the fog/mist over the stream. In this picture i raised the aperture to 5 so that the camera would capture less light and i was also lucky as less cars went by. I prefer this picture a lot more to the first one because there is not so much bright light coming from the road and you are also able to see the sky more clearly and i really like how you can see the clouds movement a little bit.
I took this photograph using an ISO of 400, an aperture of f/5, an exposure of 20" and the focal length was 28mm.

Both of these photographs where just practice photos but i thought i would include them just to show.
This photograph is a not very good attempt of long exposure to capture the stars, unfortunately my camera can only have a set exposure as low as 30 seconds or i could use bulb but this would just cause camera shake. I plan on buying a cord remote so that i can set a specific time up to 99 hours to keep the shutter open. When i took this photo i did not have a long enough exposure to capture the stars which is why they are barely visible but if i bought a remote i could set a longer exposure which would allow more light in over a longer period of time and the stars would show up brightly.
To take this photo and in fact for all of my long exposure photo's i had to find a suitable place to put my camera as i do not have a tripod. The spot needed to be flat and sturdy so that the camera did not shake, for this photograph i used a bench to place my camera. The problem with this was that i could not take the photo from the exact place that i wanted to because there was no where to put my camera.
Anyways for this photograph i used an exposure time of 30 seconds, aperture of f/5.6, ISO of 400 and a focal length of 28mm. 
This is my favorite photograph out of this bunch of long exposure photographs and i think that after editing this photo a little bit i will use it as my final "somewhere dark" because the photo was taken at night and it was extremely dark....... as well as absolutely freezing! 

Monday, 21 November 2011

(SOMEWHERE) Editing my somewhere i would be happy to sit all day

I thought about how i could edit my photographs for quite some time and i came up with the idea to use two of my photographs to create my final picture. My idea was to add the fairy lights from the second image into the bottom left hand corner of the first photograph.


Firstly i opened up the two photographs i took that i want to edit together in Photoshop as two separate images .
Then i made the second photograph the first layer and the first image the background. I did this by dragging the second picture on top of the first picture.

Instead of just using the eraser tool for the whole of the process i went through the different layer options until i found one that was closest to what i needed. I chose to use "difference" because it only showed the fairy lights from layer 1 meaning that i only had a little bit of layer 1 to erase instead of having to spend a long time to erase it all.
Here it shows that i have selected the eraser tool and i was using it to erase some of the fairy lights from the first layer as they cut across the photo and made it look messy.
I also used the clone tool to get rid of the two lines cutting across the blue flower in the original image of the fairy lights, these two lines are bits of string hanging down from the cable of the fairy lights. When using the clone tool i selected my marker of where i wanted the computer to clone and i drew over the two black lines, i selected various parts of the fairy light to clone so that it looked as unedited  as possible.
This is my final image after editing and development.

Monochrome Filter effects

This photograph was taken using Monochrome with a red filter, this makes people skin look a lot smoother and does not pic up on the detail as much so your skin will look purer and less imperfections.
This photograph has been taken using a green filter which picks up the detail of peoples skin more and shows the detail on the skin.
This photo was taken using the red filter and you can compare the two photographs to see that using the red filter makes the skin look smoother and more pale. Not picking up on the extra detail and imperfections of the skin.
This photo was also taken using red filter and you can see very clearly on her hand that it makes it smooth and paler.

Saturday, 19 November 2011

Somewhere i would be happy to sit all day!


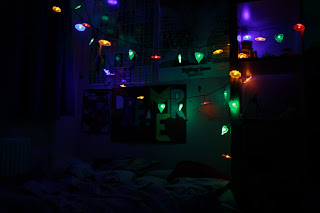
These are all pictures of Laura's bedroom and her fairy lights with the bedroom light turned off. I would be happy to sit here all day and i thought it would be fun to take photos of the fairy lights and see what i can do with them in terms of image manipulation and editing the photograph.
An idea that has already come to mind is to use the third photograph as my background image and to then edit into the bottom left hand corner stretching towards the bottom right hand corner and top left hand corner the fairy lights from the first and forth photographs.

Wednesday, 16 November 2011

(SOMEWHERE) Erik Johansson manipulation reaserch


These are a couple of Erik Johansson's manipulated images, he is very creative with his work and creates his ideas in to his work. He has designed ideas and then manipulates/re-touches/photoshops them into the original picture, for example in the second image he has designed and added the marks in the ground made by the digger to look like a naughts and crosses game.
These pictures have been edited probably using photoshop, his photos bring great interest and grab peoples attention. You have to sometimes look twice at a photo to understand what is going on. They are very creative.

Tuesday, 15 November 2011

(SOMEWHERE) image manipulation on cloning


This is one of my magazines from home which i looked through and found some information about cloning photographs, this can be useful for image manipulation as you are manipulating the image when cloning.
I did in fact use the cloning tool on Photoshop when editing my "somewhere i could sit all day" photo.

(SOMEWHERE) Amy manipulation research


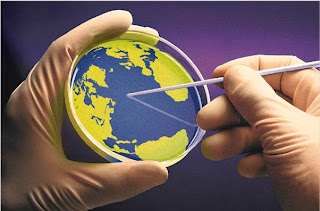
John Amy uses image manipulation to add images in to photographs that are not originally there, for example in the first photograph he has edited in shadows of scuba divers and a coral reef. By doing this he creates more interesting and active pictures.
I found these pictures on John Amy's website: http://www.johnamy.co.uk/manipulation.html
Out of 10 i rate his work 4-5 because to me he has edited the photos too much and they don't appear as photographs anymore to me, they are too edited and i feel they also look a bit tacky/cheap.
What i think John Amy has done to create these pictures is used a software/tool such as photoshop and cropped/cut out the image he wants then placed it on top of another picture and then used the softwares tools to fit it in and blend it nicely into the picture so that it does not look misplaced and just dumped onto the picture. For example in the second image he will have cropped the image of the world then pasted it onto the picture of the petrie dish and edited it to fit the petrie dish and then erase the section of the world where the stick is covering.

(SOMEWHERE) Kopacz photography research


This is some of Jonathan Kopacz work, i have chosen 3 of my favourite photographs that he has manipulated and i have also found the original photographs before he edited them so that i can see the difference and effect of how he has edited the photographs.
in the first photograph Jonathan has edited the shading a light. He has taken out the shadows and increased the light on the girls face, he has also done the same on her arms. The sun glasses have been edited and the reflections in the lenses have been taken out and lenses colour has been made less transparent, washed and made more vivid and pure with no imperfections i.e. unwanted reflections.
In the second photograph the colour of the instrument has been changed and the lighting has also been increased and the shading taken away. He has edited the tone of the woman's skin and even made her look thinner by thinning out her stomach and thighs. He has added more colour to the woman by editing her skin tone to a warmer tone.
In the third photograph the colours have been changed dramatically, the photo has been made to look alot more colourful and eye catching. The colours have been edited to look deeper and crisp. The photo looks less dull, the colour of the snow and building have been boosted.
I collected these photographs from Jonathan Kopactz's portfolio: http://jonathankopacz.com/gallery/category/19-redesigned
Out of 10 i rate Jonathan Kopacz work 9 because i like the photographs a lot especially the third photograph. I also like how he has edited and manipulated the photographs and the final outcome of his work i think is good.

(SOMEWHERE) Jordan photography research


Sara Jordan uses image manipulation to correct the colour of her photographs, here you can see some of her work and the before and after photographs once she had edited them.
Sara Jordan has show that by changing the color of the full photograph you are able to create a completely different mood as show in the second image but she also shows that just by color correcting little objects in the photograph that it can make the photograph more appealing and attractive as shown in the first and third photograph.
I collected these photographs from Sara Jordan's portfolio:  http://sjordan17.carbonmade.com/
Out of 10 i rate Sara Jordan's work 7-8 as the way she has manipulated the photographs is very effective and she also shows the before and after photos to show you the changes she has made. I also personally like the photographs she has presented.

(SOMEWHERE) bagg photography research


Farran bagg uses photo manipulation to make his photographs appear very faded and saturated. The photographer has used layers to place a photograph on top of another photograph and has made them transparent so that you can see both images as if they were one.
These images are from Farren Braggs portfolio: http://www.farranbragg.com

Out of 10 I rate Farren Braggs work 5 , i am rating the work low mainly out of personal preference as i dont like how faded the photographs are and i also find them hard to understand whats going on in the photo.